By Jim Borden

Rifle barrel cleaning seems to be something that is approached like witchcraft. I have read numerous articles on the subject and as an experienced rifle builder and competitive shooter, I have become very concerned with many of the methods and materials that are proposed for cleaning rifle barrels.
Some of the methods can cause undo wear to the barrel and some of the materials that are suggested actually can damage rifle bores. This article will address rifle barrel cleaning from the standpoint of a competitive shooter and a hunter. The methods and techniques used in cleaning competition barrels should be applied to cleaning custom hunting rifle barrels. I will also address some of the differences in the techniques for cleaning non-custom rifle barrels. Our desires as competitive shooters and as hunters are very close to the same when it comes to cleaning a rifle. We want to have the rifle maintain its accuracy and precision while at the same time preserving the life of the barrel. We also want the rifle to have a consistent point of impact after cleaned. I have watched many competitive shooters laboriously scrub their barrels between individual matches at a tournament and then watch them fire 3 to 4 rounds on the next target’s sighter bull in order to get the rifle to “settle down”. After watching one of my close friends go through this cycle at a Super Shoot, I asked him what he was doing. He said he had always heard that the barrel had to be absolutely clean in order to get the maximum accuracy out of the barrel. When I then asked why he was shooting 3 to 4 fouler shots to “settle down” the point of impact, it was as though a light bulb finally came on. He was shooting shots to lay down a light layer of fouling to make the rifle shoot consistently.
A rifle should be cleaned every 15 to 20 shots and for maximizing the long term accuracy potential of the rifle barrel, I would not ever recommend of going beyond 30 rounds between cleanings.
I have found that it is actually harmful to maximum precision to clean the barrel “squeaky” clean. The rifle barrel, like a finely tuned engine, must maintain a protective lubrication layer to minimize fouling and maximize precision. The procedures that I describe in this article have elements built in to provide for that lubrication and boundary layer protection. The procedures described here have been proven in the toughest of competitive shooting sports—registered Benchrest competition.

Proper cleaning of a rifle barrel requires some basic equipment and materials. I highly recommend the use of 1 piece cleaning rods made out of coated steel or uncoated stainless steel. I recommend stainless steel IVY rods, Dewey Coated Rods and Bore Stix coated rods. A Stainless Steel or plastic jag should be used on the rod so that a false “signal” of fouling is not detected from the bore cleaner attacking a brass jag. The one piece rods are very important to having a good method to clean the rifle without damaging the bore. The cheap, jointed rods bend and flex too much and the ones made of aluminum or brass pick up grit and mark the inside of the barrel. The rod needs to be long enough to have a brush or patch clear the muzzle with the handle still in a comfortable position at the rear. A good bore guide should be used. The bore guide is intended to guide the rod straight through the barrel to prevent barrel wear by the rod and to prevent fouling of the trigger mechanism and bedding of the rifle with solvents. The high quality bore guides are not universal—one must be purchased for each different chambering that you own. So, I would only recommend those to the purists. There are bore guides available from suppliers such as Sinclair International that can be used in many calibers and chamberings. One just has to be more careful when using one of these as they do not control the alignment of the cleaning rod as well. Phosphor bronze brushes work best and I recommend the ones with a twisted brass core such as those produced by Pro-Shot, RW Hart or Bald Eagle Precision Machine. Cotton flannel patches cut to the proper size for the bore and jag should be used. Butch’s Bore Shine is my favorite bore cleaning solvent followed by Shooter’s Choice. I also use JB paste to remove stubborn carbon or copper fouling. Butch’s contains a small amount of ammonia and if used properly will not create barrel damage. I do not recommend use of bore solvents that are basically 28% ammonia hydroxide. Most custom barrels are made of 416 R stainless steel and in the right circumstances exposure of that steel to 28% ammonia can result in light corrosion of the steel that will appear as minor pitting or hazing. Also, the 28% ammonia tends to “dry” the steel and increases surface tension. This normally results in worse fouling occurring after the first shot of the next string of shots.

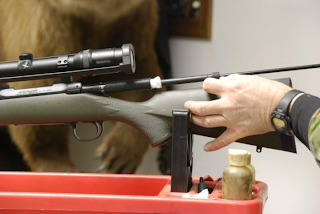
A cleaning stand should be used to steady the rifle and position it so that the rod can be easily guided through the bore in a straight manner. A cleaning stand is illustrated here with a custom hunting rifle mounted in it. Notice the bore guide that has been inserted into the action to help guide the cleaning rod. Try to position the cleaning stand high enough and at an angle that lets you easily guide the cleaning rod without bending or bowing it.

First, let’s investigate the procedure I recommend for use with custom barrels on bolt action rifles. The materials used can be applied to lever rifles, pump rifles and falling blocks-but other means would have to be used to guide the cleaning rod. First remove the bolt and set the rifle up in a cleaning cradle or lightly clamp it in a padded vise to hold the rifle steady. Select the appropriate bore guide for that individual rifle and insert the bore guide in the action insuring it is positioned in its full forward position. Select the appropriate sized cleaning rod and a patch that will snugly fit the bore (for instance I use a 30 cal jag and 2 inch round patches for 30 caliber rifles). Saturate the patch with Butch’s Bore Shine and spear the patch slightly off center and insert into the rear of the bore guide and firmly run through the barrel and let drop off after it clears the muzzle. The purpose of this first wet patch is to push the loose powder and primer residue out of the bore while at the same time wetting the bore so that the brushing will do the most good. It is important that a wet patch is used as the cleaning fluid is squeezed out of the patch and floats the material in the bore ahead of the patch and helps prevent scratching the precision finish on the inside of the barrel.

Wet a phosphor bronze brush of the correct caliber and make about 20 passes (count passes in both directions) through the barrel making sure that the brush completely leaves the bore at end of each pass. Make sure you position yourself and the rifle so that you do not bow or bend the rod while making these passes. A bowed or bent or can touch the inside of the rifle barrel and cause premature wear to the rifling that will adversely affect its performance. Wet 2 more patches and run through the bore individually to flush the loose material from the brushing out of the bore and to wet the bore so that the solution can work on powder and jacket fouling. Now let rifle set and soak about 15 minutes. Then run 2 dry patches through bore. Put 1 small drop of Butch’s Bore Shine or Kroil on a patch and spear with jag and run through bore to lightly lubricate the bore. I do not recommend using any gun oils or other such lubricants for this last step as most of them have too high a viscosity and will leave too thick a lubrication film that can actually cause hydraulic damage to the barrel when it is fired. The bore should be damp, not wet when fired the first time after cleaning. Kroil is a penetrating compound and will wet out a surface to ensure an even lubrication layer. Sinclair International is a good place to get it and it is often available at big truck stops. The last step after removing the bore guide is to use a short handled action cleaning tool with a pistol swab mounted on it to push a large patch into the chamber to remove any cleaning compound that may have deposited itself there. If a chamber is left damp it can cause the first shot to go stray and most of the time will cause higher bolt thrust and the bolt will open hard.
If you believe the rifle to be badly fouled (or after about 5 normal cleaning cycles), I then recommend that the barrel be lightly scrubbed with JB paste. I do a normal cleaning as described above as a preparation for the scrubbing with JB. I use a brush that is one caliber smaller than the rifle to be cleaned to use as a holder for the JB paste Patch. Take a patch and thoroughly impregnate with JB Paste, then wrap tightly on the brush. Insert through the bore guide into the barrel and carefully scrub the barrel with short, overlapping strokes that would be similar to a “lapping” process. Once the crown of the barrel is reached, carefully push the patch out and remove the brush and patch from the rod. Now run three to four patches soaked in bore solvent through the barrel to thoroughly flush the paste from the rifling. Run a couple of dry patches through the bore and then follow with a patch that has a single drop of solvent on it to lightly lubricate the bore.
Usually on a barrel that has been used quite a bit, the first shot after cleaning will be very close to normal point of impact. However, to make certain my rifles are ready for that all important first shot, I always foul the barrel with 1 shot before hunting with it.
One consideration that many gun owners neglect after the cleaning of a rifle is how to properly store the rifle. I recommend that rifles be stored muzzle down so that any residual oils or cleaning solvents can run to the muzzle and out of the bore. Standing a rifle on its butt for storage is asking for trouble in the future. Cleaning solvents can run down the bore into the chamber, bolt and trigger area. The cleaning solvents can gum with time and cause faulty ignition or trigger latching problems.
I leave a light film of Kroil or Butch’s Bore Shine in my Stainless Steel barrels when they are stored and have never seen any damage. I would recommend that chrome moly barrels be treated with an oil to help prevent hazing or rusting. That oil should be wiped out with Kroil or Butch’s Bore Shine prior to taking the rifle on a hunt.
The above procedures are primarily intended to be used for high quality custom barrels. The procedures may need to be modified for factory barrels depending on the interior finish and tendency of the barrel to foul. I do not believe in or recommend “break in” of high quality custom barrels the ones I use and recommend are precision made and are finely lapped as part of the manufacturing process. Factory rifles are a different story. Some are button rifled and lapped, some are cut rifled and lapped, some are rifled and unlapped and still others are hammer forged. Each manufacturer’s process may differ and each rifle has to be considered based on the “feel” of the barrel and the barrel’s behavior in terms of fouling. When first obtaining a new factory barrel, insert a bore guide and wet a patch with Butch’s Bore Shine and pass through the bore carefully with a tight fitting jag on a 1 piece rod. Note how the barrel “feels”. Try to determine if there are rough spots or tight spots. If the barrel has the feeling of loose and tight spots and/or feels rough, a thorough “break in” procedure will be required. There have been many articles written on these procedures in various magazines and I would recommend researching and trying those methods. I do not however recommend the use of any 28% ammonia hydroxide solvents in any of those procedures on stainless steel barrels.
Until next time
Good Shooting
Jim Borden
© Copyright 2008 by Jim Borden
No comments:
Post a Comment
Note: only a member of this blog may post a comment.