Showing posts with label Tactical and Combat. Show all posts

Sunday, 24 November 2013

Two Newer Lever Action Carbines Worth looking at

Big Horn Armory Model 89 lever-action rifle in .500 S&W Magnum

The 500 S&W Magnum cartridge has been around for over seven years now, but no repeating rifles have been built to fire the .500 S&W Magnum cartridge, until now.

Big Horn Armory designed their rifle around the 500 S&W Magnum cartridge, instead of trying to adapt an existing rifle to fire the cartridge. Made primarily of 17-4 stainless steel and American black walnut, the Model 89 is a very good-looking and robust rifle, but still light enough and trim enough for quick handling.

The Big Horn Model 89 is a classy-looking carbine, very well fitted and finished. The walnut wears a durable synthetic finish and a thick, effective Pachmayr Decelerator butt pad. The forend has a slight belly to it for a secure grip, but is not overly done, and goes well with the pistol grip buttstock. The metal has a matte finish and an optional black finish is offered as well. The aperture rear sight is adjustable for both windage and elevation, and the steep ramp offers a lot of adjustment range in elevation to allow the carbine to be sighted in at a wide variance of distances with a variety of bullet weights. The front post sight is also adjustable for windage correction, and is black with a vertical white bar in its rear face. The rear aperture is also black, but has a brass insert, and the aperture can be removed.

Read the whole by Jeff Quinn article at:
http://www.gunblast.com/Bighorn89.htm

The .500 Smith & Wesson is expensive in a lever action, because of the pressures this cartridge operates at. The .500 S&W runs chamber pressures up to and sometimes over 60,000 PSI. Lever actions were meant for much lower pressure cartridges like the .45-70, .30-30, .35 Remington, along with all of the handgun cartridges they chamber.

This lever action had to be custom designed and built to much higher standards to cope with the high chamber pressures of the .500. It was not as simple as converting an existing action from Marlin or Winchester.


Watch this YouTube Video:
Big Horn Armory Model 89 500 S&W Magnum Levergun - Gunblast.com
http://www.youtube.com/watch?v=Vmjb-52L2bY

Mossberg Tactical 464 SPX Lever Action

Mossberg has introduced a range of Mossberg 464 lever action rifles pimped out with picatinny rails, six position adjustable stock (including adjustable comb height), 3-dot fiber optic sights and flash suppressor.

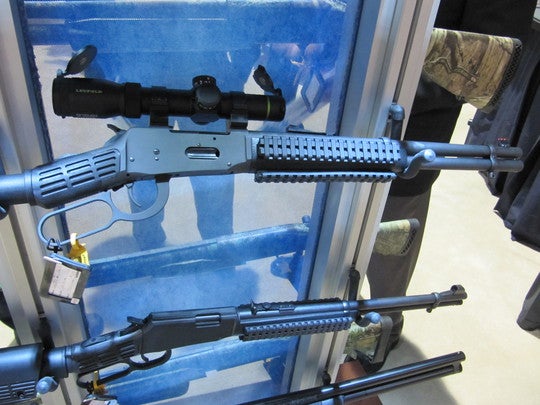
While they look weird, and are more than a little “tacti-cool”, they are practical. For both hunting and self-defense being able to mount accessories, such as lasers or flashlights, makes perfect sense. The adjustable stock works as well on a lever action as a semi-automatic.

The rifles will be avalible in .22 LR (18″ barrel, 13+1 capacity) and .30-30 (16″ barrel, 5+1 capacity). There is also a “ZMB” model

The 464 is, most basically, a lever action rifle without the wooden furniture.  Rather than go to great lengths to make the polymer look exactly like the wood it is replacing, Mossberg adopted the tools of the tactical trade.  The forend is covered up in rail.  And the stock, which is made by ATI (who makes all kinds of stocks) is actually adjustable.

The 464 holds five in the tube.  Beneath the flash suppressor, the barrel is threaded.  The rail covers the fore-end, but doesn’t extend to the top.  A rail section could be added up top, or there are options for a traditional scope mount.

The SPX weighs in at 7 pounds, and has a 16-inch barrel.  With the flash suppressor, the rifle is 34-inches long.

Read the full review at Guns.com

Friday, 1 November 2013

Valuable Tips from Jerry Miculek - world record shooter,

How to shoot a Revolver with world record shooter, Jerry Miculek! (handgun grip & stance)
http://www.youtube.com/watch?v=gEHNZFTfSD8

Jerry Miculek- What is your favorite caliber and why?
http://www.youtube.com/watch?v=382BkpHcvNo

Jerry Miculek- What is the white powder you use on your grip? How should I grip?
http://www.youtube.com/watch?v=1cVujoRccnk

Jerry Miculek- What do you mean when you say focus on the visual aspect of shooting?
http://www.youtube.com/watch?v=c-Wh9wYgeUo

Jerry Miculek - Revolver Showdown - Clip from Hot Shots TV Show
http://www.youtube.com/watch?v=no-XRaSxnzg

Jerry Miculek Practical Rifle, Opening Segment
http://www.youtube.com/watch?v=MvkbZNcWQ3w

How to shoot IDPA concealed revolver with Jerry Miculek
http://www.youtube.com/watch?v=WOrvVcv7EiI

Lessons from a Legend: Jerry Miculek - Hot Shots TV
http://www.youtube.com/watch?v=8a_GrZGcf_I

Brownells - Jerry Miculek Practical Rifle DVD Segment, Gear for the Field & Match, D1S2-5
http://www.youtube.com/watch?v=gcLSoE_PwIQ

Jerry Miculek- What advice helped you get where you are?
http://www.youtube.com/watch?v=zPxbEag__0I

Jerry Miculek Practical Rifle, Sighting In Metallic Sights
http://www.youtube.com/watch?v=wEoM8woZXX8

Miculek Competition Revolver Grips
http://www.youtube.com/watch?v=TNKz5BFS3Tk

Jerry Miculek- Why did you choose Smith & Wesson firearms?
http://www.youtube.com/watch?v=qlX60aQjNzo

Jerry Miculek - exclusive interview - GUNMAGAZIN
http://www.youtube.com/watch?v=0d2yM0NH0fk

S&W 327 & 627 review & speed shooting with fastest shooter ever, Jerry Miculek (Shoot Fast!)
http://www.youtube.com/watch?v=YiblYI_Xq5U&list=PLdTcHB0tfA3QlVLDSNv63SeM4TU_0Lytm

YouTube Search for Jerry Miculek
http://www.youtube.com/results?search_query=Jerry+Miculek&page=&utm_source=opensearch

A Few other videos of value

Quickstrips vs Speedloaders
http://www.youtube.com/watch?v=D14UHmf0yN0

Improving your handgun shooting
http://www.youtube.com/watch?v=AxNd2qCr2l8
(The grip and stance should perhaps be ignored, but some good tips otherwise)

Wednesday, 23 October 2013

The Over-reliance on Firearms Leads to a False Sense of Security

A handgun is nothing other than a false sense of security

A motivated individual who poses a lethal threat will not be stopped by a shot to the leg or arm. This has been documented over and over. The mentally ill along with those who are under the influence of drugs or alcohol feel less to pain due to their mental state.

Example:
http://en.m.wikipedia.org/wiki/1986_FBI_Miami_shootout

Fight or Flight

Second under high stress, your blood consolidates to the vital organs reducing blood flow to the brain. With less blood going to the brain, fine motor skills and ocular performance decrease rapidly. This makes it nearly impossible to shoot weapons out of the threat's hands or hit a moving limb like TV super heroes.

If you have participated in any force-on-force training using ConSim (Conflict Simulator) or UTM type equipment you would experience this for yourself.

To summarize the only way to truly stop a threat from harming you or someone else is centre mass or head shots.

Second the only way to overcome the human body's physiological response to acute stress (i.e. adrenaline dump) is to train people to point their weapon system directly outward from their chest with both hands, preferably in daylight and dankness. This naturally lends itself to a centre mass shots.

Almost always in attack situations the shooter will not see their sights, only the threat. "Aiming" does not occur, but the body is able to perform gross motor skills movements.

First off let me say there is a definite need for firearms in personal and third party security in certain environments and situations.  I firmly support the right to keep and bear arms and also recognize their utility in many different scenarios. That said some people put too much confidence in their ability to use their weapon to protect themselves against a myriad of threats.

This over-reliance can cause them to downplay or ignore skills like situational awareness, avoidance, de-escalation, less-lethal weapons and unarmed combatives.  There are good legal and ethical reasons for considering and training in skill-sets across the use of the force continuum.  Obviously using a firearm is not the best response to every situation.  Beyond that there are also good tactical reasons to use other options.

21 Foot Rule

The 21 foot rule states that the average person with a knife or sword can get to and cut a person in about the same time that the average person can draw and fire a handgun.

In the time it takes the average officer to recognize a threat, draw his side-arm and fire 2 rounds at centre mass, an average subject charging at the officer with a knife or other cutting or stabbing weapon can cover a distance of 21 feet.

Originally presented by Dennis Tueller, a sergeant in the Salt Lake City, Utah Police Department in an article called “How Close is Too Close?” published in SWAT Magazine in 1983, the 21 foot rule posits that a police officer with his or her weapon holstered will not be able to respond in time to stop an attacker armed with a knife attacking from 21 feet or less distance.  In other words someone with a knife can cover 21 feet (7 meters) of ground and attack the officer before he or she can draw their weapon and shoot the attacker.

In the years since the idea was first introduced it has been debated and some have argued the distance is actually more than 21 feet – proposing 30 feet or some other number.  We don’t need to dwell on this – suffice to say that there is a very real concern that a motivated assailant could attack an armed citizen / law enforcement officer / protective agent, etc. before they have an opportunity to use their weapon to defend themselves.  Additionally, it’s important to realize the attacker does not need to have a knife or some other edged weapon.  An impact weapon or even bare hands can constitute a very significant threat if the attacker can rapidly close in and engage the victim.

For this reason its critical that persons involved in daily weapons carriage, either for personal protection or professional reasons practice awareness and have some level of skill at unarmed combatives – at least enough to defend against the initial assault and create a gap where they can safely draw their weapon.

If you don't think someone can close the distance between you and them in a couple of seconds and kill you with a single strike to the head with piece of steel, you are miss informed. Google "21 foot rule".

Over-reliance on Firearms

Unfortunately too many people believe carrying a firearm in and of itself is a “magic bullet”  - excuse the pun.  As we see illustrated in the 21 foot rule – having a firearm is no assurance if it can’t be deployed in time in the face of an oncoming threat.  It’s critical that defensive skills be more complete than just firearms skills for a variety of reasons.  Not the least of which is the tactical reality than you might not get your weapon into play in the face of a sudden threat.

Most assaults will occur within arm’s reach, meaning that, unless you were able to covertly draw the handgun and have it at retention, while intercepting / jamming the initial strike/ attempt to grab, your gun taken away / it won’t have effect on target / its utility will be reduced.

Six out of seven people shot with a handgun survive. Only 5% survive gunshot wounds to the head. Even after having been shot, many a drugged or adrenalin pumped assailant will still be able to attack and even kill you. In the case of an attacker with a knife, unless shot exactly in the “credit Card” area (Between the upper lip and the eyes where the Medulla is), the bad guy will still have enough momentum to crash into its intended victim. Meaning stabs/ slashes/ uncool stuff gets done to you..

Most important is avoidance, deterrence, escape, de-escalation, unarmed combatives before drawing that handgun.

Unless the attacker(s) is at a distance already, in that case, the handgun will give you that edge, but the Law may still be against you.

Mindset, Strategy, Skills and Weaponry

To take on today's criminals require specialist training, specialist equipment and specialist methods.
What are YOU doing to avoid you and your family becoming the victims of ruthless criminals?
How serious are you about you and your family’s safety?
Serious enough to attend a training session?
Or are you counting on military training that is only a vague trace in your memory?

Recommended Training and Equipment
Fortis Pro-active Defence Solutions
Link/URL: http://www.fortisgroup.co.za/

Sources:
http://protectiveconcepts.wordpress.com/2012/11/25/the-21foot-rule-and-over-reliance-on-firearms/

Friday, 3 May 2013

Forensic laboratory tests have clinically disproven the reliability of kinetic energy, knockdown and velocity

The NEW .825 G&S Online Express Magnum

It seems that all game are becoming immune to standard calibre firearms. What our grand-fathers used to shoot with .22 long rifles are now considered too tough for that calibre. What we used to shoot with a .270 Win can now no longer be brought down by it, because the animals have grown immune to it and we are now having to resort to at least .375 calibres to defend ourselves against the ferocious impala. 

So tough have game become that we find more-and-more hunters resorting to the .416 Rigby, because impala, let alone other much larger game like the Eland, are now being born with steel re-enforced rib cages. 

As far as handguns go things are even worse and in answer to this huge problem we introduce ..... 

The NEW .825 G&S Online Express Magnum

"The first magnum handgun cartridge, the .357 Magnum, was therefore introduced in 1935 to shift the balance of power back to the handgun hunter. For at time, it did. At the time of its introduction the .357, loaded to the previously unheard of (for a handgun) MAP of about 43,000 psi, was the most powerful handgun cartridge in the world. It was loaded with a 158 grain bullet at a muzzle velocity (MV) of 1550 fps and muzzle energy (ME) of 845 ft. lbs. The .357 was used to bag all North American big game, including elk, moose and the great bears, before the beginning of the Second World War. Big game was still relatively weak in that bygone era, so practically no one felt any need for a more powerful handgun hunting cartridge.

However, by the end of World War II wild game was becoming too tough for the .357 Magnum. Elk and moose were becoming impervious even to perfectly placed .357" bullets. (Today, of course, we all know that even the smallest deer have become completely immune to .357 Magnum bullets.)  Experiments to again redress the balance of killing power were underway in earnest by 1950 and in 1956 the result, the .44 Remington Magnum, was born.

This new cartridge, billed as the world's most powerful handgun cartridge, was standardized at a MAP of 36,000 psi. The original loads drove a 240 grain bullet at a MV of 1470 fps with ME of 1150 ft. lbs. The .44 Mag. was used to kill all manner of heavy game, such as elk, moose and the great bears; it did so with authority. All across North America hunters heaved sighs of relief. Protected by a .44 Magnum revolver, it was once again safe to venture into the woods.

Unfortunately, that happy state of affairs only lasted until the 1970s. By that time elk and moose had begun to shrug off solid hits by .429" (.44 Mag.) bullets. In desperation, some handgun hunters began carrying crystals for protection in the field and storing their .44 Magnum ammunition inside pyramids specially constructed for the purpose. (A secondary benefit of the latter practice came to light when it was discovered that these pyramid shapes also sharpened razor blades.) " - Chuck Hawks

To read the rest of this article click HERE

Muzzleloader Realtime Hunting Day 1 Scene 3 with a Black powder Revolver .44 Caliber
YouTube Link: http://www.youtube.com/watch?v=eXyEic36XyM

Terminal Bullet Performance in Muzzleloading

"I liked your article: it makes many good points. The KE (kinetic energy) fallacy is so pervasive that it needs to be corrected as often as possible. The arrow is a good example: I think it helps to drive the point home if you mention how much KE a hunting arrow has (a 500 grain arrow traveling at 200 ft/sec has a KE of 44 ft. lb.). Thus the largest game in the world (including elephant) is hunted and killed with a projectile having only about 2/3 the KE of a 22 Short bullet. That should give pause to even the most ardent KE advocates." - M. Fackler (Terminal Bullet Performance in Muzzleloading)

To read this article click HERE

Dr. Martin L. Fackler is a retired Colonel in the US Army's Medical Corps, he was a battlefield surgeon, and the head of the Wound Ballistics Laboratory for the US Army’s Medical Training Center, Letterman Institute.

He is credited with a number of contributions to the field of terminal ballistics including:
  • Developing and testing improved media in which the effects of bullet wounds could be simulated. This led to the widespread acceptance of 10% ballistic gelatin for evaluating penetration and expansion of projectiles.
  • Establishing effects of projectile design and shape on wounding.
  • He hypothesized that wound depth was much more important than previously thought, and recommended ammunition that could send a bullet at least twelve inches into his ballistic gelatin.
  • He was the first researcher to demonstrate that fragmentation was the most effective means of inflicting wounds in a modern military rifle round. He asserted that yawing and cavitation do not typically cause severe tissue trauma. Or, that the "permanent wound cavity" or actual damage caused by a projectile is the primary "stopping power" mechanism and that the "temporary wound cavity" or shock wave produced by the projectile is at best a secondary mechanism, if not irrelevant.
  • He has over 250 articles in print concerning wound ballistics and most were published in medical journals.

Big Bore Airgun Hunting - Stalking one of Africa's larger species of Antelope, the Red Hartebeest, with the Benjamin Rogue .357 AIRGUN
YouTube Link: http://www.youtube.com/watch?v=0o0XVa5oyMU

Also watch:

Extreme Muzzleloader Hunting in South Africa 175 Yards kill with a Inline Muzzleloader
http://www.youtube.com/watch?v=UdR8Q424JIM

Sources
http://www.chuckhawks.com/825_magnum.htm
http://www.chuckhawks.com/terminal_performance_muzzleloading.htm
http://en.wikipedia.org/wiki/Martin_Fackler

Tuesday, 9 April 2013

Reading the Wind When Hunting

Thomas Haugland, a Shooters’ Forum member from Norway, is a long-range target shooter and hunter. He has created an interesting video showing how to gauge wind velocities by watching trees, grass, and other natural vegetation. The video commentary is in English, but the units of wind speed (and distance) are metric. Haugland explains: “This is not a full tutorial, but rather a short heads-up to make you draw the lines between the dots yourself”. Here are some conversions that will help when watching the video (thanks Boyd):

.5 m/s = 1.1 mph | 1 m/s = 2.2 mph | 2 m/s = 4.5 mph
3 m/s = 6.7 mph | 4 m/s = 8.9 mph | 5 m/s =11.2 mph

To watch this interesting and worthwhile video, click HERE
(or copy and paste the URL: http://www.accurateshooter.com/shooting-skills/reading-the-wind-when-hunting/)

More Interesting Videos from Norway
There are many other interesting videos on Haugland’s YouTube Channel, including Game Stalking,Precision Reloading, and Tips on how to use a Mildot Reticle on a scope with MOA-based clicks.

Reading the Wind — USAMU Tips
(United States Army Marksmanship Unit)

The term, “Reading the Wind” is misleading. A more apt title might be “The tactical negotiation of varying wind conditions and the limitation of their negative effects on the flight of your bullet.” In this article we will discuss some tactics and techniques that will enhance your abilities to negotiate the wind and (hopefully) add a few points to your score. This article will be divided into two sections: Part One will cover the 200- and 300-yard stages. Part Two will be devoted to the 600-yard stage.

There are as many dimensions to “wind reading” as there are stages to High Power competition. Your tactical mindset, or philosophy, must be different for the 200- and 300-yard rapid-fire stages than it would be for the 600-yard slow-fire. In the slow-fire stages you have the ability to adjust windage from shot to shot, utilizing the location of the previous shot as an indicator. Additionally, a change to the existing conditions can be identified and adjusted for prior to shooting the next shot.

Part 1: Rapid Fire at 200 and 300 Yards
Part 2: 600-Yard Firing

To read the full article click HERE
(Or copy and paste the URL: http://www.accurateshooter.com/shooting-skills/readingwind/)

Horizontal Wind-Drift vs. Distance
OK, if the wind is blowing 10 mph from 9 o’clock and if my horizontal wind deflection is .7 inches at 100 yards, what is the drift at 1000 yards?

Well, roughly speaking, since the target is ten times more distant, the wind-drift must be around 7 inches, maybe a little more since the bullet will be slowing down. Seems reasonable right?
WRONG.

Lateral deflection by a 10mph crosswind is (roughly speaking) a function of the square of the distance. In this example, the TRUE deflection is .7″ times (10×10) — about 70 inches!!

I was going through some back issues of Precision Shooting Magazine and this was explained in detail. Now, I remained skeptical, so I checked my Pejsa Ballistics Calculator, which is just about the most accurate program I’ve found to describe the behavior of high BC bullets in flight.

For a 168 Sierra MK (.308), leaving the muzzle at 2700fps with a .464 BC, the numbers are as follows, with a 10mph, 9 o’clock crosswind:
  • Drift at 100: .75 moa (3/4″)*
  • Drift at 200: 1.57moa (3.14″)
  • Drift at 500: 5.06moa (25.3″)
Quoting the article: “Note that the deflections at 100 yards are typically a quarter of those at 200; lateral deflections increase as the square of the range”. Precision Shooting, June 2000, p. 16.

For my 260 Rem load, 123 Scenar (.547BC), 2930fps, same 10mph conditions, Pejsa predicts:
  • Drift at 100: .48 moa (1/2″)
  • Drift at 500: 2.73 moa (13.65″)
  • Drift at 1000: 6.48 moa (64.8″)
Again, even with a higher BC bullet, at 1000yds we end up with something pretty close to the 100-yard deflection (i.e. 1/2″) multiplied by (10×10). Our calculated drift at 1000 is 64.8″ — that’s over 100 times the 100-yard lateral drift in inches, even though the distance has only increased 10x.

* for simplicity, I’m calculating 1 moa = 1″ x distance / 100 .

To read the full article click HERE
(Or copy and paste the URL: http://www.accurateshooter.com/shooting-skills/horizontal-wind-drift-vs-distance/)

FREE Ballistics Software: Use the JBM online ballistics program or download Pejsa and PointBlank Software.

Wind Drift by Gerard Schultz. Excellent technical Article which dispells many misconceptions about bullet performance. Useful charts plotting effect of both BC and distance on wind drift.

Sunday, 7 April 2013

How Canting Affects Accuracy

Canting Effect on Point of Impact

Avoid Inconsistent Canting for Better Accuracy and Higher Scores

Experienced marksmen know they should keep their rifles level when shooting. But they may not understand exactly what happens if they allow their rifle to be canted (tilted left or right), even a few degrees. While the physics are complicated to explain, here’s what you need to know: if you cant your rifle to the left, your shots will impact to the left, and lower, than your point of aim. Likewise, if you cant your rifle to the right, your bullets will impact low and right.

Effects of Rifle Canting
The effects of rifle canting are explained in great detail on the Long Shot Products Ltd. website. There, you’ll find a technical discussion of the Physics of Rifle Canting, plus a page with Sample Targets shot with canted rifles.


Referring to the above illustration, the Long Shot Products article explains: “Notice how the trajectory of the vertical hold stays within the vertical plane, so when the projectile drops, it drops into the line of sight and down to the center of the target. The trajectory of the cant hold does not achieve the same height as the trajectory of the vertical hold and the projectile diverges from the line of sight, thereby missing the target.”
The Long-Shot article makes two other important points. First, cant error increases with distance, and second, cant-induced windage errors are worsened by mounting your scope high above the bore axis.
“This component of cant error becomes more significant at more distant targets due to the increased original included angle between the line of sight axis and the bore axis (more elevation compensation) at the vertical hold. Use of large-diameter objective scopes, mounted high off the barrel, exacerbates the cant error problem. To keep the scope elevation knobs centered for maximum adjustment, precision shooters sometimes use elevation-compensated scope mounting rings or bases. Although this solves the adjustment problem, it greatly exaggerates cant error because the distance between the bore axis and the line of sight axis increases and the included angle between the sight axis and the bore is larger, producing more windage error when canting.”

Effects of Rifle Canting at Long Range — David Tubb Explains

Eleven-Time NRA National High Power Champion David Tubb knows a bit about long-range shooting. One of the key factors in long-range accuracy is making sure that the tilt/cant of your rifle does not change throughout your shot string. In the clip below, the first in McMillan’s Master Class Video series, David Tubb explains the importance of keeping your rifle level. He explains that, at 1000 yards, your Point of Impact can change dramatically by canting the rifle either right or left. David states that, when shooting at 1000 yards, if your rifle is level and your shot is centered-up on a 72″ (six-foot) square target, you can actually put your next shot OFF PAPER by canting your rifle. That means you can move Point of Impact (POI) three feet or more, just by canting your rifle!

Bryan Litz confirms Tubb’s observation. Bryan tells us that, as a general rule of thumb (for common cartridges), a 1° cant will produce five (5) inches of lateral displacement at 1000 yards. Thus, if you cant your rifle just 8°, the POI would move 40″ from the center of the target, putting the shot off the edge of a 72″-wide target.
David explains that, after one of his students has made two or three 1000-yard, X-Ring hits with a LEVEL rifle, “then I’ll have him take his rifle, and cant it to the right. I’ll have him shoot a shot. He will MISS the six-foot-square frame off to the right. Then I’ll have him cant his gun to the left and shoot another shot. He will miss the six-foot-square frame to the left.”
Rifle Hold and Canting — Consistency Counts
Remember that you must maintain the exact same amount of rifle cant from shot to shot. Yes, some iron sights shooters do tilt their rifle slightly to achieve a better hold or to index their sights better. However, these shooters do not changethe tilt from shot to shot — the amount of cant remains the same on every shot.

When shooting prone with a scoped rifle it’s probably best to keep the rifle dead level, with the scope’s vertical crosshair straight up and down. Use a rifle-mounted bubble level to maintain a level hold, and avoid canting the gun either to the left or to the right. Affordable bubble levels that mount to your scope or scope rail can be purchased from Brownells and other vendors, starting at about $15.00.

Test Targets Reveal Cant Errors
The Long Shot Products Ltd. website also displays actual Test Targets showing the effects of canting error. These targets were shot with air rifles and rimfire rifles, but the same effects can and will occur with centerfire rifles. Shown below is a target shot at 50 yards with a Feinwerkbau .22LR match rifle using RWS Match ammo (1012 fps MV). As you can see, canting the rifle 20 degrees to the left produced a huge movement of the point of impact. The shots from the canted rifle impacted 1.81″ Left, and 0.6″ below the point of aim.

Further reading

Cures for Vertical Stringing
Vertical in your shot strings can result from myriad gear issues and gun-handling mistakes. Speedy Gonzalez, noted shooter, gunsmith and recent inductee into the Benchrest Hall of Fame, offers these pearls of wisdom. Try to isolate one item at a time as you work to improve your groups.
Link: http://www.accurateshooter.com/shooting-skills/cures-for-vertical-stringing/

More Affordable Anti-Cant Alternatives
If you don’t need to make angled shots, you can get a simple rail-mounted B-Square bubble level. Mounting Solutions Plus offers a tube-mounted anti-cant device with bubble level on top. If you prefer the bubble level on the side (for easier viewing) U.S. Optics makes a sturdy, rail-mount bubble level.

Article source: http://www.accurateshooter.com/optics/canting-effect-on-point-of-impact/

bubble level mount

anti-cant Device U.S. Optics

Saturday, 6 April 2013

Standing Position Shooting Technique

Standing and Trigger Control
By SGT Brandon Green, USAMU Service Rifle Team Member


The CMP webzine, The First Shot, currently features an excellent article for any rifleman (hunter or competitor) who employs the standing position. Authored by USAMU Team member Sgt. Brandon Green, the story covers rifle hold, body positioning, and trigger control. Sgt. Green writes: “We’ve all been there—on the two hundred yard line and in our three-minute prep period. As you stand there looking through your sights, you just can’t seem to make them stay in the center of your target or even close for that matter. You know that your three minutes are running out quickly, so what are you going to do? This is the time when a lot of shooters start to come unraveled….We all know how to stand up, but it’s the standing still part that gives us trouble most of the time.”

Sgt. Green continues: “We will start our position rebuild at the feet. You normally want your feet about shoulder width apart and perpendicular to the target. Some shooters like to keep their weight evenly distributed between the heels and balls of their feet, but this may not be the best position for you. I normally try to find a place on the firing line where my toes are just slightly higher than my heels, maybe a 1/4 to 1/2 inch higher. With my toes slightly higher, I feel a little more of the pressure on the balls of my feet. This usually helps me eliminate some of the back and forth movement in my position by inducing a little tension in my calf muscles.

At this point I will check for excess tension in other parts of my legs. I notice that excess tension in my upper legs can also cause me to sway back and forth more than usual. By rotating each foot in or out, I can usually find a position that will eliminate this excess tension and help my legs feel more relaxed. I then check the tension in my knees. I don’t shoot with my knees locked, but they aren’t exactly bent either. I find where they are comfortable and stick with it. Now that my legs are at a good starting point, I move up to my hips and waist. I normally shoot with my hips perpendicular to the target and twist at the waist slightly. This is more of an international style rifle position than a traditional highpower position, but it is very comfortable and relaxed for me. With my waist only slightly twisted, I can rest my forward arm almost directly on my hip bone instead of bringing it around and resting it on my ribs.”  [Continued...]

Read the full article here: http://www.odcmp.org/1007/default.asp?page=USAMU_STANDING

Wednesday, 3 April 2013

Firearm Negligence - The importance of proper training

This is a compilation video I put together to show students in my firearms classes. NONE of these video clips are mine, all credit goes to the original owners. They were pilfered from individual videos and other compilations.

Shown are negligent discharges, improper equipment checks and uses, improper attire and using a firearm that the person is incapable to use or unfamiliar with.

The intent of this compilation is to be able to show students some relative examples while discussing firearm safety and responsibility. Some of the clips have been included specifically to spark or demonstrate instruction in particular areas of safety, sometimes through exaggeration.

Since these clips are not my own, I felt it was only proper to share them back out through YouTube for others to be able to use them as I am intending to use them.


Source: http://www.youtube.com/watch?v=Et33bbA0GeM

Sunday, 31 March 2013

How to Sight in a Scope - Step by Step Guide


A Gundata.org article
Author: Jason Brumett

The following is a step by step guide on how to sight in a scope, also known as zeroing in. Even if you've sighted one in before this post could be used as a refresher.

The article details Dominant Eye Issues, Breathing Techniques, Picking a Scope, Necessary Equipment, Target, Rifle Position, and Shot Group.

Hope this is of some use to you, if it is be sure to Share, Like, Tweet, and Email this article to your friends.

Dominant Eye

For first time shooters finding your dominant eye is important. Some people are under the impression that using your dominant arm is required for shooting a weapon, but it doesn't really matter which arm you use to shoot with as long as you use your dominant eye.
Dominant Eye Triangle
  • Make a triangle with your hands facing flat as if you were going to do a diamond push-up.
  • Pick an object in the distance such as a picture on a wall or a fire alarm on the ceiling.
  • Keeping your arms at a 90 degree angle; look through the triangle you made with your hands and slowly extend your arms outward while staying focused on the object.
  • Once your arms are fully extended close each eye one at a time to see which is centered on the object-that will be your dominant eye and the side of your body that you place the butt of your rifle on when shooting.

Breathing Technique

Breathing is an important part of shooting to make sure each shot is well-placed. Practicing breathing before going to the range can help cut down on the time it takes to zero in a rifle. Shot groups are used in groups of three to determine how a scope needs to be adjusted to hit the center of a target. If one shot is a few inches off compared to the other two, then that has to do more with breathing than anything else. This breathing method can be put into practice while at home.

  • Close your eyes and focus on when you inhale and exhale
  • Each time you exhale there's a small pause before you inhale. This is when your body is balanced and is the best time for each shot to be fired.
  • Once you can determine the pausing point between your breathing use that to imagine firing your rifle each time it happens.
  • Firing a rifle during this pausing point will eliminate any erratic shot groups to help zero in a rifle.

Picking a Scope

f you have a bolt action rifle make sure to bore sight your rifle before you go to the range after you have mounted the scope.

When mounting a scope make sure to use the proper mount and screws to fit the rifle that is being fired. This will eliminate any potential problems with the scope becoming dislodged when a rifle kicks.

Necessary Equipment

Call ahead if unsure what type of lanes and materials the range you are going to has on its grounds. Some basic items to bring with you can help the process go more quickly.

  • Padding for your shoulder to help shield from a rifle kick
  • Rifle Rest or Sand Bags to use as a turret for better shot groups
  • Enough ammo to zero in the rifle. Try to get ammo from the same lot number which can be found on the side of each box.
  • Screwdrivers for adjusting the scope
  • 25 to 100 Meter targets
  • Black Marker to mark your previous shots
  • Binoculars to look down range to see each shot group

Target
How to Sight in a Scope
Targets are usually set-up for 25 meters for first group and 100 meters to zero in a rifle for maximum point blank range. Each three round shot group should be aimed at the center bulls-eye for the duration of the zero in process. A shot group consists of three well-placed shots, which in turn should be marked to see which direction you need to move the elevation and windage on the scope.

Rifle Position

Rifle position is important to maintain. Once finding a comfortable position to zero in a rifle, make sure it is the same position you fire from every single time.

  • Make sure to have the rifle butt firmly placed in then soft tissue area on the shoulder just below your clavicle. Don't place it directly into your clavicle or you could cause damage to your shoulder/bone.
  • The opposite arm you are using should be under the forearm of the rifle and the end of the rifle forearm should be on the rifle rest or sandbags.
  • A well placed grip behind the trigger area of the rife to ensure it doesn't move during each shot. Do not place your finger on the trigger until you are ready to shoot.
  • Use the soft padding just below your distal phalange on your index finger to fire each shot. It should take barely any effort to squeeze each shot on the trigger if done correctly.
  • Place your nose or the side of your cheek on the barrel of the rifle. Do not get directly in front of the scope and bolt, or you will get smacked in the face after each shot from the recoil. Once you have found a comfortable spot to place your face for firing position this should be where you place your face EVERY single time for each shot group.

Shot Group
Shot Group
Once you have determined your shot group in relation to the center of the target you can then adjust the elevation and windage on the scope. The scope should have directions on how many clicks per-meters it should be moved.

For example: if you have a shot group in the top-right you would adjust the scope down and left. Continue to do this until you get three (9 Total shots) well-placed shot groups in the center of the target.

100 Meter Target

The final step is to determine the maximum point blank range. Set-up a target at 100 meters and using the same method of shot groups. Long range rifles (.243 w/90 Grain bullet or .270 w/130 grain) should be adjusted to land 2.5 inches above the center of the target and medium range rifles (30-30 w/150 grain or .300 Savage w/165 grain) should land 3 inches above the target. Once the elevation and windage is correct and you have three more (9 total shots) well-placed groups then you have successfully zeroed in your rifle.

Source: http://gundata.org/blog/post/how-to-sight-in-scope/

Wednesday, 27 March 2013

The Girandoni Air Rifle that changed the world

The Girandoni Air Rifle was an airgun designed by Tyrolian inventor Bartholomäus Girandoni circa 1779. The weapon was also known as the Windbüchse ("wind rifle" in German).

This is one of the most interesting videos I have watched in a very long while and a must-watch for any firearm enthusiast.

Half of the US land mass was conquered by merely demonstrating this amazing rifle.


Girandoni air rifle as used by Lewis and Clark. A National Firearms Museum Treasure Gun
http://nramuseum.com/ Lewis and Clark's secret weapon - a late 18th Century .46 cal. 20 shot repeating air rifle by Girandoni , as used bin the Napoleonic Wars. A Treasure Gun from the NRA National Firearms Museum. See more at http://nramuseum.com/. Narrated by Phil Schreier.


The modern .45 calibre airgun
History and use
The Girandoni air rifle was in service with the Austrian army from 1780 to around 1815. The advantages of a high rate of fire, no smoke from propellants, and low muzzle report granted it initial acceptance, but it was eventually removed from service for several reasons.

While the detachable air reservoir was capable of around 30 shots it took nearly 1500 strokes of a hand pump to fill those reservoirs to around 800 psi.

Later, a wagon-mounted pump was provided. The reservoirs themselves, made from hammered sheet iron held together with rivets and sealed by brazing, proved very difficult to manufacture using the techniques of the period and were always in short supply.

In addition, the weapon was very delicate and a small break could make it inoperable. Finally, it was very different from any other weapon of the time and any soldier using it needed to be highly trained.

The Lewis and Clark Expedition used the rifle in the demonstrations that they performed for nearly every Native American tribe they encountered on the expedition.

Design and capabilities
File:Girandoni Air Rifle.jpg
The rifle was 4 ft (1.2 m) long and weighed 10 lbs (4.5 kg), about the same basic size and weight as other muskets of the time. It fired a .46 caliber ball at a velocity similar to that of a modern .45 ACP and it had a tubular, gravity-fed magazine with a capacity of 20 balls. This gravity operated design was such that the rifle had to be pointed upwards in order to drop each ball into the breech block. Unlike its contemporary, muzzle-loading muskets, which required the rifleman to stand up to reload with powder and ball, the shooter could reload a ball from the magazine by holding the rifle vertically while lying on his back and operating the ball delivery mechanism. The rifleman then could roll back into position to fire, allowing the rifleman to keep a "low profile".

Contemporary regulations of 1788 required that each rifleman, in addition to the rifle itself, be equipped with three compressed air reservoirs (two spare and one attached to the rifle), cleaning stick, hand pump, lead ladle, and 100 lead balls, 1 in the chamber, 21 in the magazine built into the rifle and the remaining 80 in four tin tubes. Equipment not carried attached to the rifle was held in a special leather knapsack. It was also necessary to keep the leather gaskets of the reservoir moist in order to maintain a good seal and prevent leakage.

The air reservoir was in the club-shaped butt. With a full air reservoir, the Girandoni air rifle had the capacity to shoot 30 shots at useful pressure. These balls were effective to approximately 150 yards on a full load. The power declined as the air reservoir was emptied.

Importance
The Girandoni air rifle was an important first. It was the first repeating rifle of any kind to see military service. It was one of the first uses of a tubular magazine. And, although it saw service for only 35 years, it predated and was more advanced in design and mechanical technology than the Henry rifle which arrived fifty years later.

Source: http://en.wikipedia.org/wiki/Girandoni_Air_Rifle

Laser Shot Hunter Training Systems

Laser Shot and Fortis

Seeing as how hunting is your thing, you may be interested the Laser Shot training by Fortis - see info below:


Come join us for an introduction to the Laser Shot simulation training system, and very specifically how it can benefit hunters of all ages!

Yes, you will be allowed to take a pot shot at that Kudu, or if you feel you are up to it, a charging lion. In all, you will get an opportunity to shoot at about 12 animals, filmed in their natural environments!

Standing alone or in groups, behind branches, crossing each other, even a charging elephant - typical scenario's your average hunter encounters on a regular basis, or will at some stage.

You will quickly understand how beneficial Laser Shot can be to your ultimate hunting success in the bush.

Buck fever? Yes, that old monster that manifests itself in an inability to control a shot! Few hunters have never had the "pleasure" of battling to breathe and shaking like an old granny! Laser Shot can help you cure that.

Please join us to learn more about this exiting system and shot placement than you have ever believed possible, and to test your skills - bring your friends, fellow hunters and kids!

Bring a chair, and we will see you there.

RSVP - Riaan Coetzee - sales@fortisgroup.co.za
RSVP – Bruce Staples - info@lasershot.co.za

For more info click here:
http://www.lasershot.co.za/open-evening.html

To learn about the benefits of using Computerised Laser Technology for firearm training, click here:
http://www.lasershot.co.za/benefits.html

To learn more about Fortis Proactive Self-Defence Solutions, click here:
http://www.fortisgroup.co.za/

Wednesday, 16 January 2013

Brass vs. Steel Cased Ammo – An Epic Torture Test

There are two major types of centerfire rifle cartridges available on the market today:
  • Those which are loaded with steel, and
  • Those which are loaded with brass
brass vs. steel cartridges piled up.
This seemingly simple variation has caused a never ending stream of argument, discussion, speculation, and questioning from new and seasoned shooters alike.  Complicating the conversation are other variables that typically get lumped into the argument without proper segmentation, such as:

Thursday, 27 December 2012

Four Fundamentals of Marksmanship

The soldier must understand and apply the four key fundamentals before he approaches the firing line. He must establish a steady position allowing observation of the target. He must aim the rifle at the target by aligning the sight system, and fire the rifle without disturbing this alignment by improper breathing or during trigger squeeze. These skills are known collectively as the four fundamentals. Applying these four fundamentals rapidly and consistently is the integrated act of firing.

Steady Position

When the soldier approaches the firing line, he should assume a comfortable, steady firing position. The time and supervision each soldier has on the firing line are limited. He must learn how to establish a steady position during integrated act of dry-fire training. The firer is the best judge of the quality of his position. If he can hold the front sight post steady through the fall of the hammer, he has a good position. The steady position elements are as follows.

Thursday, 20 December 2012

Navy SEAL Training Tips: Mental Preparation

[The following is an excerpt from SEAL SURVIVAL GUIDE: A Navy SEAL's Secrets to Surviving Any Disaster, written by Former Navy SEAL and preeminent American survivalist Cade Courtley.]

The brain is the strongest muscle in the body. You've heard stories of how combat soldiers have been shot repeatedly but were not aware of it until the fight was over. These stories are true, and the power to do such things comes from the mind and can be tapped into by practicing mental preparation. This practice can allow you to far exceed your physical limitations. Just as you train other muscles, you can train the brain with mental-preparedness exercises -- and you don't need to go to the gym to do it! It's an exercise you can do anywhere. I can't stress enough how important mental preparedness is for surviving and enduring any life-threatening situation that you could encounter. This is how you practice it.

Sunday, 9 December 2012

Range Finding - How to estimate distance

I'm still doing simple things like estimating distance based on "how many football fields" it appears to be. Closer it matters less for a rifle, but with a pistol its good to know if that shot you just made is at 10 meters or 30 meters.

One trick I use when outdoors for telling how much daylight is high target and your thumb nail for example:

Extend your hand doing a big thumbs up in front of you.

Your entire thumbnail will cover a 12" target at a certain distance.
Half the height of your thumbnail will cover a 12" target at a certain distance.
A quarter of your thumbnail will cover a 12" target at a certain distance, and so on.

But we need to be more accurate.....

Sunday, 2 December 2012

The Definitive Military Service Calibre and Rifle For the 21st Century


Introduction

Hi, my name is Mike Staples and I am an ex Australian Army Fitter Armament or to put it more simply, an Armourer. My experience takes in all Australian Military Weapons including pistols, rifles, SMGs, LMGs, HMGs, Mortars, recoilless rifle, and artillery pieces, as well as mounted guns in our Armoured vehicles that were current at the time of my service. On top of that experience is my love of shooting, which started when I was around 6 years of age and has continued to this day, some 51 years later. I have been asked by Mr. Hawks to write an article on a suitable calibre for a General Purpose Military Rifle (GPMR), and whilst the calibre is important the delivery system, a.k.a. the rifle, is equally so. That being the case, this first article will establish what I feel is a suitable calibre to replace the 5.56mm NATO round, whilst the second part will put forward suggestions on a suitable rifle.


There has been a multitude of cartridges that have been used by the worlds Military Forces, and to compare all of them in the pursuit of the "perfect calibre" for the 21st Century would take many pages and many hours of research. Therefore, I will concentrate on those which have been used by the US, Australia, Great Britain, and NATO Forces in recent history.

Since the Vietnam War there has been a move to make one calibre "the NATO calibre," and at this point in time that calibre is the 5.56mm NATO. The main reason for this, from my perspective, is to make all aligned forces users of this calibre. NATO is a collage of many countries. When NATO forces either take up arms against an aggressor or have become an occupation force on behalf of the United Nations inside a country that has experienced a war or uprising, many soldiers from different countries make up that force. If all used a different calibre in their GPMR, ammunition re-supply would be a nightmare.

Saturday, 1 December 2012

Combat Mindset - The Cooper Color Code

For those who are prepared to take a couple of minutes and read about a system that saves lives. It costs no money, only small and sustained effort to implement it and make it part of your daily existence.

If you do not realise the absolute necessity of this mindset your are either not living in SA, you are completely ignorant as to what is happening in this country and therefore not paranoid enough, or your are simply just plain stupid.

Nowadays we should constantly be functioning in yellow and never white, because we do not have that luxury. While we are driving on the road we should be flipping between yellow and orange as we approach intersections with traffic lights and stop signs, who is next to us, behind us and even in front of us.

The most important means of surviving a lethal confrontation, according to Cooper, is neither the weapon nor the martial skills. The primary tool is the combat mindset, set forth in his book, Principles of Personal Defense. In the chapter on awareness, Cooper presents an adaptation of the Marine Corps system to differentiate states of readiness.

Defining civil unrest

By Claire Wolfe

Look up "preparations for civil unrest" on Google and...What's that echo I hear?—you'll find nothing that's going to help you. In fact, you won't even easily turn up a good definition of what civil unrest is.

Like "indecency," the definition seems to be in the eye of the beholder.

I wouldn't consider a peaceful anti-war march to be civil unrest, for instance, but a police chief might. Similarly, I wouldn't consider acts of localized non-violent lawbreaking (like environmental activists chaining themselves to a tree) to be civil unrest; but a timber company official probably believes otherwise.

Civil unrest occurs when anger, frustration, or fear turn disruptive on a mass scale. Or when government officials crack down because they anticipate such disruptions. Crackdowns can lead to further frustration, leading to further crackdowns and so on—especially when the crackdowns look unwarranted and tyrannical.