Tuesday 9 April 2013

Reading the Wind When Hunting

Thomas Haugland, a Shooters’ Forum member from Norway, is a long-range target shooter and hunter. He has created an interesting video showing how to gauge wind velocities by watching trees, grass, and other natural vegetation. The video commentary is in English, but the units of wind speed (and distance) are metric. Haugland explains: “This is not a full tutorial, but rather a short heads-up to make you draw the lines between the dots yourself”. Here are some conversions that will help when watching the video (thanks Boyd):

.5 m/s = 1.1 mph | 1 m/s = 2.2 mph | 2 m/s = 4.5 mph
3 m/s = 6.7 mph | 4 m/s = 8.9 mph | 5 m/s =11.2 mph

To watch this interesting and worthwhile video, click HERE
(or copy and paste the URL: http://www.accurateshooter.com/shooting-skills/reading-the-wind-when-hunting/)

More Interesting Videos from Norway
There are many other interesting videos on Haugland’s YouTube Channel, including Game Stalking,Precision Reloading, and Tips on how to use a Mildot Reticle on a scope with MOA-based clicks.

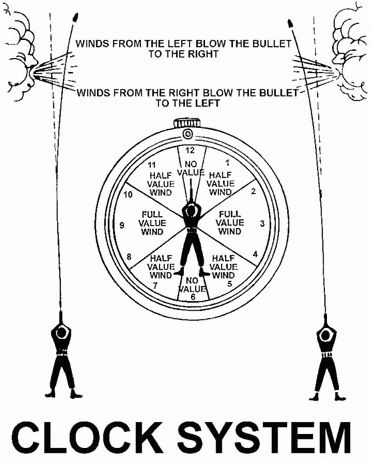
Reading the Wind — USAMU Tips
(United States Army Marksmanship Unit)

The term, “Reading the Wind” is misleading. A more apt title might be “The tactical negotiation of varying wind conditions and the limitation of their negative effects on the flight of your bullet.” In this article we will discuss some tactics and techniques that will enhance your abilities to negotiate the wind and (hopefully) add a few points to your score. This article will be divided into two sections: Part One will cover the 200- and 300-yard stages. Part Two will be devoted to the 600-yard stage.

There are as many dimensions to “wind reading” as there are stages to High Power competition. Your tactical mindset, or philosophy, must be different for the 200- and 300-yard rapid-fire stages than it would be for the 600-yard slow-fire. In the slow-fire stages you have the ability to adjust windage from shot to shot, utilizing the location of the previous shot as an indicator. Additionally, a change to the existing conditions can be identified and adjusted for prior to shooting the next shot.

Part 1: Rapid Fire at 200 and 300 Yards
Part 2: 600-Yard Firing

To read the full article click HERE
(Or copy and paste the URL: http://www.accurateshooter.com/shooting-skills/readingwind/)

Horizontal Wind-Drift vs. Distance
OK, if the wind is blowing 10 mph from 9 o’clock and if my horizontal wind deflection is .7 inches at 100 yards, what is the drift at 1000 yards?

Well, roughly speaking, since the target is ten times more distant, the wind-drift must be around 7 inches, maybe a little more since the bullet will be slowing down. Seems reasonable right?
WRONG.

Lateral deflection by a 10mph crosswind is (roughly speaking) a function of the square of the distance. In this example, the TRUE deflection is .7″ times (10×10) — about 70 inches!!

I was going through some back issues of Precision Shooting Magazine and this was explained in detail. Now, I remained skeptical, so I checked my Pejsa Ballistics Calculator, which is just about the most accurate program I’ve found to describe the behavior of high BC bullets in flight.

For a 168 Sierra MK (.308), leaving the muzzle at 2700fps with a .464 BC, the numbers are as follows, with a 10mph, 9 o’clock crosswind:
  • Drift at 100: .75 moa (3/4″)*
  • Drift at 200: 1.57moa (3.14″)
  • Drift at 500: 5.06moa (25.3″)
Quoting the article: “Note that the deflections at 100 yards are typically a quarter of those at 200; lateral deflections increase as the square of the range”. Precision Shooting, June 2000, p. 16.

For my 260 Rem load, 123 Scenar (.547BC), 2930fps, same 10mph conditions, Pejsa predicts:
  • Drift at 100: .48 moa (1/2″)
  • Drift at 500: 2.73 moa (13.65″)
  • Drift at 1000: 6.48 moa (64.8″)
Again, even with a higher BC bullet, at 1000yds we end up with something pretty close to the 100-yard deflection (i.e. 1/2″) multiplied by (10×10). Our calculated drift at 1000 is 64.8″ — that’s over 100 times the 100-yard lateral drift in inches, even though the distance has only increased 10x.

* for simplicity, I’m calculating 1 moa = 1″ x distance / 100 .

To read the full article click HERE
(Or copy and paste the URL: http://www.accurateshooter.com/shooting-skills/horizontal-wind-drift-vs-distance/)

FREE Ballistics Software: Use the JBM online ballistics program or download Pejsa and PointBlank Software.

Wind Drift by Gerard Schultz. Excellent technical Article which dispells many misconceptions about bullet performance. Useful charts plotting effect of both BC and distance on wind drift.

Sunday 7 April 2013

How Canting Affects Accuracy

Canting Effect on Point of Impact

Avoid Inconsistent Canting for Better Accuracy and Higher Scores

Experienced marksmen know they should keep their rifles level when shooting. But they may not understand exactly what happens if they allow their rifle to be canted (tilted left or right), even a few degrees. While the physics are complicated to explain, here’s what you need to know: if you cant your rifle to the left, your shots will impact to the left, and lower, than your point of aim. Likewise, if you cant your rifle to the right, your bullets will impact low and right.

Effects of Rifle Canting
The effects of rifle canting are explained in great detail on the Long Shot Products Ltd. website. There, you’ll find a technical discussion of the Physics of Rifle Canting, plus a page with Sample Targets shot with canted rifles.


Referring to the above illustration, the Long Shot Products article explains: “Notice how the trajectory of the vertical hold stays within the vertical plane, so when the projectile drops, it drops into the line of sight and down to the center of the target. The trajectory of the cant hold does not achieve the same height as the trajectory of the vertical hold and the projectile diverges from the line of sight, thereby missing the target.”
The Long-Shot article makes two other important points. First, cant error increases with distance, and second, cant-induced windage errors are worsened by mounting your scope high above the bore axis.
“This component of cant error becomes more significant at more distant targets due to the increased original included angle between the line of sight axis and the bore axis (more elevation compensation) at the vertical hold. Use of large-diameter objective scopes, mounted high off the barrel, exacerbates the cant error problem. To keep the scope elevation knobs centered for maximum adjustment, precision shooters sometimes use elevation-compensated scope mounting rings or bases. Although this solves the adjustment problem, it greatly exaggerates cant error because the distance between the bore axis and the line of sight axis increases and the included angle between the sight axis and the bore is larger, producing more windage error when canting.”

Effects of Rifle Canting at Long Range — David Tubb Explains

Eleven-Time NRA National High Power Champion David Tubb knows a bit about long-range shooting. One of the key factors in long-range accuracy is making sure that the tilt/cant of your rifle does not change throughout your shot string. In the clip below, the first in McMillan’s Master Class Video series, David Tubb explains the importance of keeping your rifle level. He explains that, at 1000 yards, your Point of Impact can change dramatically by canting the rifle either right or left. David states that, when shooting at 1000 yards, if your rifle is level and your shot is centered-up on a 72″ (six-foot) square target, you can actually put your next shot OFF PAPER by canting your rifle. That means you can move Point of Impact (POI) three feet or more, just by canting your rifle!

Bryan Litz confirms Tubb’s observation. Bryan tells us that, as a general rule of thumb (for common cartridges), a 1° cant will produce five (5) inches of lateral displacement at 1000 yards. Thus, if you cant your rifle just 8°, the POI would move 40″ from the center of the target, putting the shot off the edge of a 72″-wide target.
David explains that, after one of his students has made two or three 1000-yard, X-Ring hits with a LEVEL rifle, “then I’ll have him take his rifle, and cant it to the right. I’ll have him shoot a shot. He will MISS the six-foot-square frame off to the right. Then I’ll have him cant his gun to the left and shoot another shot. He will miss the six-foot-square frame to the left.”
Rifle Hold and Canting — Consistency Counts
Remember that you must maintain the exact same amount of rifle cant from shot to shot. Yes, some iron sights shooters do tilt their rifle slightly to achieve a better hold or to index their sights better. However, these shooters do not changethe tilt from shot to shot — the amount of cant remains the same on every shot.

When shooting prone with a scoped rifle it’s probably best to keep the rifle dead level, with the scope’s vertical crosshair straight up and down. Use a rifle-mounted bubble level to maintain a level hold, and avoid canting the gun either to the left or to the right. Affordable bubble levels that mount to your scope or scope rail can be purchased from Brownells and other vendors, starting at about $15.00.

Test Targets Reveal Cant Errors
The Long Shot Products Ltd. website also displays actual Test Targets showing the effects of canting error. These targets were shot with air rifles and rimfire rifles, but the same effects can and will occur with centerfire rifles. Shown below is a target shot at 50 yards with a Feinwerkbau .22LR match rifle using RWS Match ammo (1012 fps MV). As you can see, canting the rifle 20 degrees to the left produced a huge movement of the point of impact. The shots from the canted rifle impacted 1.81″ Left, and 0.6″ below the point of aim.

Further reading

Cures for Vertical Stringing
Vertical in your shot strings can result from myriad gear issues and gun-handling mistakes. Speedy Gonzalez, noted shooter, gunsmith and recent inductee into the Benchrest Hall of Fame, offers these pearls of wisdom. Try to isolate one item at a time as you work to improve your groups.
Link: http://www.accurateshooter.com/shooting-skills/cures-for-vertical-stringing/

More Affordable Anti-Cant Alternatives
If you don’t need to make angled shots, you can get a simple rail-mounted B-Square bubble level. Mounting Solutions Plus offers a tube-mounted anti-cant device with bubble level on top. If you prefer the bubble level on the side (for easier viewing) U.S. Optics makes a sturdy, rail-mount bubble level.

Article source: http://www.accurateshooter.com/optics/canting-effect-on-point-of-impact/

bubble level mount

anti-cant Device U.S. Optics

Saturday 6 April 2013

Standing Position Shooting Technique

Standing and Trigger Control
By SGT Brandon Green, USAMU Service Rifle Team Member


The CMP webzine, The First Shot, currently features an excellent article for any rifleman (hunter or competitor) who employs the standing position. Authored by USAMU Team member Sgt. Brandon Green, the story covers rifle hold, body positioning, and trigger control. Sgt. Green writes: “We’ve all been there—on the two hundred yard line and in our three-minute prep period. As you stand there looking through your sights, you just can’t seem to make them stay in the center of your target or even close for that matter. You know that your three minutes are running out quickly, so what are you going to do? This is the time when a lot of shooters start to come unraveled….We all know how to stand up, but it’s the standing still part that gives us trouble most of the time.”

Sgt. Green continues: “We will start our position rebuild at the feet. You normally want your feet about shoulder width apart and perpendicular to the target. Some shooters like to keep their weight evenly distributed between the heels and balls of their feet, but this may not be the best position for you. I normally try to find a place on the firing line where my toes are just slightly higher than my heels, maybe a 1/4 to 1/2 inch higher. With my toes slightly higher, I feel a little more of the pressure on the balls of my feet. This usually helps me eliminate some of the back and forth movement in my position by inducing a little tension in my calf muscles.

At this point I will check for excess tension in other parts of my legs. I notice that excess tension in my upper legs can also cause me to sway back and forth more than usual. By rotating each foot in or out, I can usually find a position that will eliminate this excess tension and help my legs feel more relaxed. I then check the tension in my knees. I don’t shoot with my knees locked, but they aren’t exactly bent either. I find where they are comfortable and stick with it. Now that my legs are at a good starting point, I move up to my hips and waist. I normally shoot with my hips perpendicular to the target and twist at the waist slightly. This is more of an international style rifle position than a traditional highpower position, but it is very comfortable and relaxed for me. With my waist only slightly twisted, I can rest my forward arm almost directly on my hip bone instead of bringing it around and resting it on my ribs.”  [Continued...]

Read the full article here: http://www.odcmp.org/1007/default.asp?page=USAMU_STANDING

Wednesday 3 April 2013

Firearm Negligence - The importance of proper training

This is a compilation video I put together to show students in my firearms classes. NONE of these video clips are mine, all credit goes to the original owners. They were pilfered from individual videos and other compilations.

Shown are negligent discharges, improper equipment checks and uses, improper attire and using a firearm that the person is incapable to use or unfamiliar with.

The intent of this compilation is to be able to show students some relative examples while discussing firearm safety and responsibility. Some of the clips have been included specifically to spark or demonstrate instruction in particular areas of safety, sometimes through exaggeration.

Since these clips are not my own, I felt it was only proper to share them back out through YouTube for others to be able to use them as I am intending to use them.


Source: http://www.youtube.com/watch?v=Et33bbA0GeM

Marlin Firearms Closes In North Haven, Ending 141 Years Of Manufacturing In Connecticut

by Brock Townsend

A half-dozen workers were in otherwise empty offices Friday at The Marlin Firearms Co. as the company wound down 141 years of manufacturing in Connecticut.

A security phone at the visitor's gate was unattended next to a large barren parking lot off Bailey Road near I-91. A reception room that resembles a ski lodge, complete with a fireplace, was dark. The few people left working Friday declined to comment, but one employee said there were six people inside and that Friday was their last day of work.

Marlin was acquired in 2008 by Remington Arms Co. Inc., which is a subsidiary of Freedom Group Co. of Madison, N.C. Three years ago, Marlin employed 345 people at its headquarters in North Haven and 225 in Gardner, Mass., at the former Harrington and Richardson plant that Marlin had acquired.

"I think it's a huge loss," said Larry Lazaroff, co-owner of Arnold's Jewelers, a longtime local business in the North Haven Shopping Center.

He cited Pratt & Whitney closing its North Haven plant in 1993, saying that the loss of any major employer reduces the customer base for local businesses.

Remington said in March 2010 that it would close the North Haven Marlin plant, which had 265 employees at that point. The company has been at its 225,000-square-foot facility on a 23-acre site in North Haven since 1968. Before that, it was on Willow Street in New Haven.

Marlin was founded when John M. Marlin left Colt in 1870 and started manufacturing his own line of revolvers and derringers. In 1924, Frank Kenna, an attorney, bought the company at auction and the Kenna family owned Marlin until its sale to Remington.

Marlin was the rifle of choice for famous sharpshooter Annie Oakley, who was in William "Buffalo Bill" Cody's circus.

Source: http://freenorthcarolina.blogspot.com/2013/04/marlin-firearms-closes-in-north-haven.html